Summary (AI Generation)
This document explains how to install Vaultwarden in a Docker environment with HTTPS enabled. It covers the process of installing Vaultwarden using Docker, obtaining a free domain through nip.io, and configuring SSL certificates with Certbot. It also includes setting up reverse proxy through NGINX and verifying HTTPS configuration.
Install Vaultwarden on Docker with HTTPS enabled
You should have
- Docker (Portainer as well)
- Host Linux OS
What we will do
Install Vaultwarden and NGINX on Docker
Get free domain by appending
.nip.ioto your IP addressConfigure SSL certificate with Certbot
What we will get
Vaultwarden with HTTP secure
Reverse proxy of your web Vaultwarden with NGINX
Free Bitwarden premium features! 😄
Install Vaultwarden on Docker
On your current terminal location,
mkdir vaultwarden
cd vaultwarden
then, create docker-compose.yml
touch docker-compose.yml
vim docker-compose.yml
and here is the content of my docker-compose
services:
  vaultwarden:
    image: vaultwarden/server:latest
    container_name: vaultwarden
    restart: always
    environment:
      # DOMAIN: "https://{YOUR_DOMAIN}.nip.io"
      SIGNUPS_ALLOWED: "true"
    volumes:
      - /opt/vw:/data
    ports:
- 11001:80docker compose up -d && docker compose logs -fAfter that, check the status using docker ps or manage it through Portainer.
Access the local port 11001 to verify the interface:
http://{LOCAL_IP}:11001
However, since we're in an HTTP environment where plaintext is transmitted directly, let's set up HTTPS. (Vaultwarden is configured to not run in an HTTP environment anyway.)
Let's get a certificate using Certbot Let's Encrypt
WARNING
I will assume you are using router that supports management.
Opeing port 80 (http) to get certificate is crucial otherwise it will fail. Close the port after successfully obtaining the certificate.
There are several ways to issue the certificates, but I'll use Docker with certbot + standalone method which I find the easiest.
When running the certbot Docker image in standalone mode, port 80 is required for the verification process, so we'll expose port 80 when running the container:
docker run -it --rm --name certbot \
            -v "/etc/letsencrypt:/etc/letsencrypt" \
            -v "/var/lib/letsencrypt:/var/lib/letsencrypt" \
            -p 80:80 \
            certbot/certbot certonly
Go ahead and select 1
How would you like to authenticate with the ACME CA?
- - - - - - - - - - - - - - - - - - - - - - - - - - - - - - - - - - - - - - - -
1: Runs an HTTP server locally which serves the necessary validation files under
the /.well-known/acme-challenge/ request path. Suitable if there is no HTTP
server already running. HTTP challenge only (wildcards not supported).
(standalone)
2: Saves the necessary validation files to a .well-known/acme-challenge/
directory within the nominated webroot path. A seperate HTTP server must be
running and serving files from the webroot path. HTTP challenge only (wildcards
not supported). (webroot)
- - - - - - - - - - - - - - - - - - - - - - - - - - - - - - - - - - - - - - - -
Select the appropriate number [1-2] then [enter] (press 'c' to cancel): 1
Type your domain name
Please enter the domain name(s) you would like on your certificate (comma and/or
space separated) (Enter 'c' to cancel): {YOUR_DOMAIN}.nip.io
Successfully received certificate.
Certificate is saved at: /etc/letsencrypt/live/{YOUR_DOMAIN}.nip.io/fullchain.pem
Key is saved at: /etc/letsencrypt/live/{YOUR_DOMAIN}.nip.io/privkey.pem
This certificate expires on 2099-00-00.
These files will be updated when the certificate renews.
NEXT STEPS:
- The certificate will need to be renewed before it expires. Certbot can automatically renew the certificate in the background, but you may need to take steps to enable that functionality. See https://certbot.org/renewal-setup for instructions.
- - - - - - - - - - - - - - - - - - - - - - - - - - - - - - - - - - - - - - - -
If you like Certbot, please consider supporting our work by:
* Donating to ISRG / Let's Encrypt: https://letsencrypt.org/donate
* Donating to EFF: https://eff.org/donate-le
- - - - - - - - - - - - - - - - - - - - - - - - - - - - - - - - - - - - - - - -Your certificate is now located in /etc/letsencrypt. Your certificate will expire in 90 days. To renew your certificate, try below command.
docker run -it --rm --name certbot \
            -v "/etc/letsencrypt:/etc/letsencrypt" \
            -v "/var/lib/letsencrypt:/var/lib/letsencrypt" \
            -p 80:80 \
            certbot/certbot renew
Install NGINX
Let's prepare docker-compose.yml and default config files in the same way we installed vaultwarden.
Since we'll be working in the terminal's current directory, place both files in the same location.
mkdir nginx
cd nginx
touch docker-compose.yml
touch default.conf
vim docker-compose.yml
docker-compose.yml
services:
  nginx:
    image: nginx
    network_mode: host
    volumes:
      - ./default.conf:/etc/nginx/conf.d/default.conf
      - /etc/letsencrypt:/etc/letsencrypt
default.conf
server {
  listen              443 ssl;
  server_name         {YOUR_DOMAIN}.nip.io;
  ssl_certificate     /etc/letsencrypt/live/{YOUR_DOMAIN}.nip.io/fullchain.pem;
  ssl_certificate_key /etc/letsencrypt/live/{YOUR_DOMAIN}.nip.io/privkey.pem;

  location / {
    proxy_pass        http://localhost:11001;
  }
}docker compose up -d && docker compose logs -fWe are all good to go. If configured correctly, you should be able to access Vaultwarden with HTTPS.
Verify HTTPS works
I don't know any software aside from Wireshark, so I will be using Wireshark to diagnose packes.
HTTP
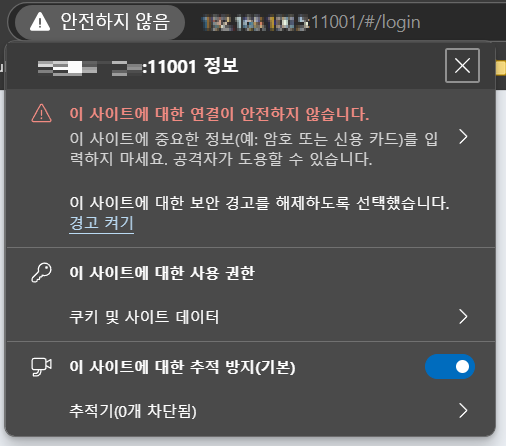
localhost:11001 will direct to your Vaultwarden but your web browser will give you a warning for sure.
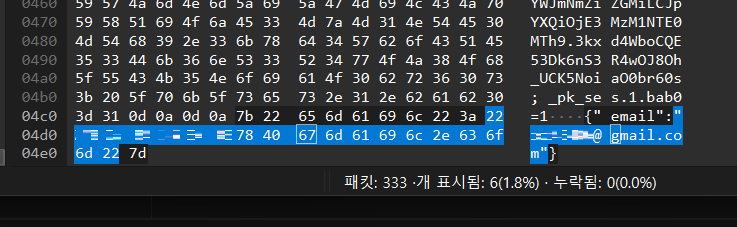
plain text confirmed!
HTTPS
Let's try https
https://{YOUR_DOMAIN}.nip.io
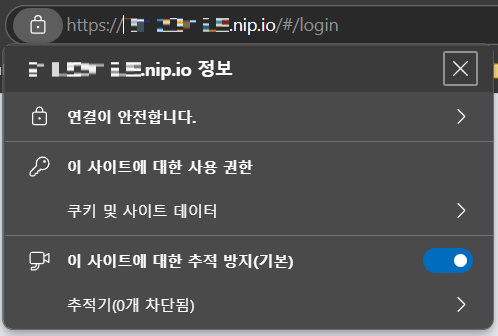
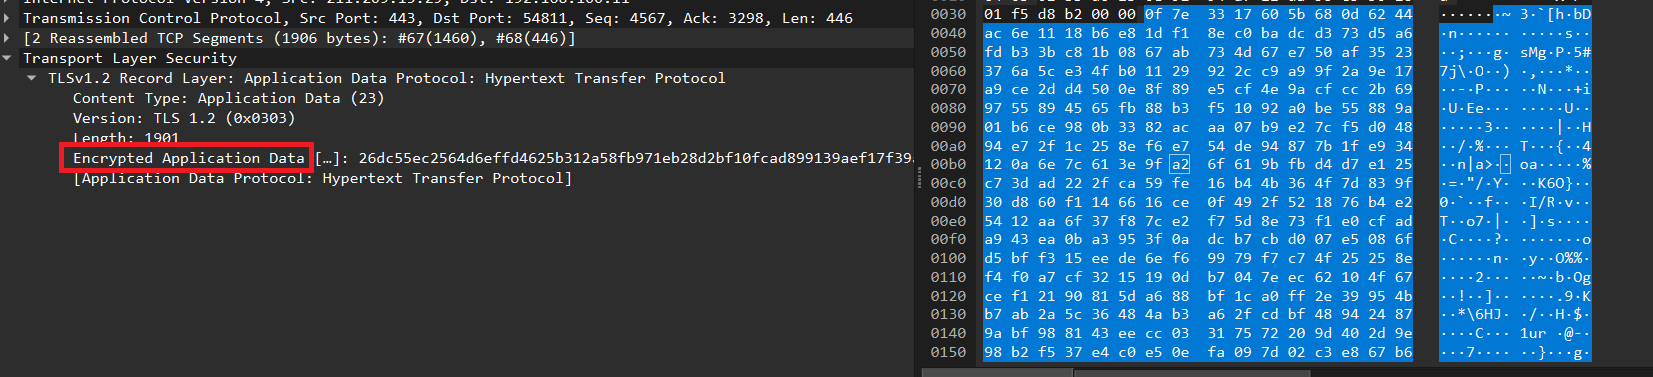
The website's certificate is valid and the packets are properly encrypted, making them unreadable.
Enjoy!
I've implemented an additional security measure.
Case 1: If the database gets hacked, the passwords are already hashed, so there's no need to worry.
Case 2: If someone physically gains control of my Vaultwarden.
My main concern is Case 2, so I added an extra layer of protection by:
Vaultwarden password + Mentally storing a 3-character suffix (or numeric, which I won't disclose)
This simple technique enhances security through "something you have" (Vaultwarden) and "something you know" (mental suffix).
Since even a single character change completely alters the password hash, I hope this provides protection against potential attacks.